How To Make Juice Without a Juicer: What You Need to Know
If you want fresh homemade juice but don’t own a juicer, this How To Make Juice Without a Juicer guide walks you through simple, practical methods using everyday kitchen tools. You’ll learn how to blend and strain properly, juice different types of produce, fix common problems, and make recipes that taste just as good as juicer-made juice.
How To Make Juice Without A Juicer
You can easily make excellent juice at home using common kitchen tools you already own. This article shows multiple methods, step-by-step instructions for different fruits and vegetables, recipes, troubleshooting tips, and storage advice so you can enjoy fresh juice without a specialized appliance.
Why make juice without a juicer?
Making juice without a juicer saves money, takes up less counter space, and gives you control over texture and pulp. You’ll also be able to use tools you already have, giving fresh juice to family and friends even if a juicer isn’t available.
What to expect when you don’t use a juicer
You’ll notice differences in texture and yield compared with a centrifugal or masticating juicer. Some methods retain more fiber, while others produce a clearer juice. Understanding trade-offs helps you choose the method that meets your taste and nutrition goals.
Basic equipment alternatives and why they work
You can substitute many common kitchen items for a juicer. Each option extracts liquid in a different way, so choose based on the produce you’re juicing and how much effort you want to put in.
Blender (or high-speed blender)
A blender purees fruits and vegetables into a thick liquid. You’ll need to strain the result with a fine mesh strainer, cheesecloth, or nut milk bag to separate juice from pulp. Blenders are ideal for soft fruits, berries, and tender greens.
Food processor
A food processor chops produce quickly and creates a coarse pulp that can be pressed through a strainer or bag. It works well for firmer fruits and many vegetables.
Box grater or microplane
Grating breaks produce into small pieces that release juice when pressed. This is a low-tech option for items like ginger, citrus rinds, or softer fruits.
Mortar and pestle or potato masher
For small quantities, mashing can release juice from berries or softened fruits. It’s a manual method that works well when you don’t need large volumes.
Citrus reamer or juicer (handheld)
A handheld citrus reamer or manual press works wonderfully for lemons, limes, oranges, and grapefruits. These tools extract a lot of juice quickly with minimal cleanup.
Cheesecloth, nut milk bag, or fine mesh strainer
These are the essential finishing tools to separate liquid from pulp after blending, processing, grating, or mashing. Nut milk bags give a finer strain than many strainers and are excellent for smooth, pulp-free juice.
Potato ricer or manual press
A potato ricer can be used to squeeze cooked or softened fruits and vegetables. Manual fruit presses will yield more liquid but are less common in typical kitchens.
Comparison table: methods at a glance
| Method | Best for | Texture | Yield | Effort |
|---|---|---|---|---|
| Blender + strainer | Soft fruits, leafy greens, berries | Smooth to pulpy (depending on straining) | High (retains water) | Moderate |
| Food processor + press | Hard fruits, some vegetables | Coarse pulp | Moderate | Moderate |
| Grater + press | Ginger, garlic, citrus zest, soft fruits | Coarse | Low to moderate | Low to moderate |
| Citrus reamer | Citrus fruits | Clear, pulpy or less pulpy | High for citrus | Low |
| Mortar & pestle | Small batches, herbs, berries | Thick pulp | Low | High |
| Potato ricer | Cooked fruits, berry mash | Coarse | Moderate | Low to moderate |
Preparing produce for juicing without a juicer
Preparation affects flavor, safety, and how easily you extract juice. Take a few minutes to prep produce well for best results.
Washing and sanitizing
Wash all fruits and vegetables under running water and scrub firm produce with a brush. If you’re using leafy greens or delicate berries, rinse gently in a bowl of water and lift them out to avoid bruising.
Peeling, coring, and trimming
Remove thick peels from citrus, melons, and pineapple. Core apples and pears and cut away large seeds from stone fruits. You can leave edible skins (like apple skin) if you want more fiber and nutrients, but tougher skins may cause bitter flavors.
Cutting into manageable pieces
Cut produce into chunks that fit in your blender, food processor, or strainer. Smaller pieces blend and press more easily.
Softening tougher vegetables and fruits
For very fibrous vegetables (like beets) or cooked fruit juice, roasting or steaming briefly can soften them and release more juice. Let them cool slightly before blending.
Method 1 — Using a blender (step-by-step)
A blender is the most versatile non-juicer method. It handles soft fruits, many vegetables, and leafy greens. Follow these steps for clear, tasty juice.
Step 1: Prepare produce and liquids
Chop produce into chunks. For leafy greens, bundle them into the blender along with an amount of water or coconut water — about 1/4 to 1/2 cup per 2 cups of produce as a starting point. The added liquid helps the blender create a smooth puree.
Step 2: Blend until smooth
Start at low speed and increase to high. Blend for 30–90 seconds depending on the power of your blender and the toughness of the produce. You want a smooth, uniform liquid.
Step 3: Strain the puree
Pour the puree through a fine mesh strainer, cheesecloth, or nut milk bag. If using a strainer, press with the back of a spoon or spatula. If using a bag, gather the edges and squeeze until the liquid runs clear.
Step 4: Taste and adjust
Add lemon or lime for brightness, a bit of ginger for spice, or a small sweetener if needed. Stir and serve over ice or chill as desired.
Tips for blenders
- Cold produce blends better and tastes fresher. Add a few ice cubes if you want a chilled drink.
- Use the tamper for thick blends to avoid air pockets.
- A high-speed blender gives a smoother result and can handle tougher produce like ginger or raw beets better.
Method 2 — Using a food processor
A food processor is great for coarse pulping, then pressing out juice. Use this when you want more control over pulp level.
Step 1: Chop and pulse
Cut produce into chunks and pulse in the food processor until you have a coarse mash. Avoid over-processing into a paste.
Step 2: Transfer and press
Spoon the mash into a cheesecloth, nut milk bag, or a strainer lined with cheesecloth. Press with a spatula or use a heavy object to apply pressure. For more efficiency, put the bag in a bowl and twist the top to squeeze.
Step 3: Repeat if needed
Process in batches for large quantities. You can run the pulp through the food processor a second time with a small amount of water to extract additional juice.
When to pick a food processor
Choose this method for firmer apples, pears, and some root vegetables that don’t puree smoothly in standard blenders. It produces slightly more pulp in the final juice unless you strain well.
Method 3 — Grate and press (manual)
For ginger, citrus, or small batches of softer fruits, grating and pressing is quick and effective.
Step 1: Grate the produce
Use a fine grater or microplane for ginger, turmeric, or citrus zest. For softer fruits like peaches, a coarse grater works here.
Step 2: Squeeze out juice
Wrap grated produce in a small piece of cheesecloth or a clean dish towel and squeeze over a bowl. For citrus, a handheld reamer often gives the most juice quickly.
Advantages of grating
This method minimizes waste and is a low-tech solution when you only need a small amount of juice—perfect for cocktails, dressings, or flavor boosters.
Method 4 — Potato ricer or nut milk bag press
If you have a potato ricer, you can push softened fruit or vegetable chunks through the holes and collect the juice. A nut milk bag provides a controlled squeeze for finer results.
How to use a potato ricer
Place small portions of cooked or softened produce in the ricer and press over a bowl. This works well with cooked apples, pears, or berries you’ve simmered briefly to soften.
How to use a nut milk bag
Fill the bag with blended puree, gather the top, and squeeze over a bowl. The bag gives excellent control and yields a smooth, low-pulp juice.
Method 5 — Steam or simmer and strain
For fruits and certain vegetables, gently steaming or simmering loosens juices and concentrates flavor. This results in a softer texture and a clear, intense juice.
When to use heat
Beat the heat method for hard produce like beets, rhubarb, or when you want a syrupy concentrate for desserts or cocktails. Avoid heating leafy greens if you want fresh, raw nutrients.
Basic process
Simmer chopped produce with a little water until softened, mash or blend, then strain through cheesecloth. Cool and refrigerate or dilute with water for a refreshing drink.
Best techniques for specific produce
Different fruits and vegetables respond better to different extraction techniques. Matching method to produce improves yield and flavor.
Citrus (oranges, lemons, limes, grapefruit)
Use a handheld reamer or a manual press for fastest results. For grapefruit or thick-skinned citrus, cut in half and press firmly. Strain if you want less pulp.
Soft fruits (berries, peaches, mango, watermelon)
Blend and strain. Watermelon can be blended and poured through a strainer with minimal pressing. Berries yield their best flavor from gentle blending and fine straining to remove seeds.
Firm fruits (apples, pears)
Blend or pulse in a food processor and strain. You can also chop and simmer briefly to soften before pressing for more yield. For apples, leave skin on for extra nutrients unless it’s waxed—wash well.
Root vegetables (carrots, beets)
Best in a high-speed blender with some water, then strained. For beets, roasting first can bring out sweetness and make them easier to puree.
Leafy greens (spinach, kale, parsley)
Blend with enough water to move the blades, then strain through a nut milk bag or fine strainer. Greens produce less juice by volume but pack nutrients; combine with fruits for flavor.
Celery
Blend with water and strain. Celery blends smoothly but can foam; allow it to settle before straining to reduce foam in your final drink.
How to deal with pulp: leave it or use it?
Pulp contains fiber, vitamins, and bulk. Your choice depends on health goals and culinary preferences.
Keep the pulp (no-strain)
If you want maximum fiber, skip straining. This yields a smoothie-like beverage rather than a clear juice. It’s great for satiety and slower sugar absorption.
Strain and discard
If you prefer a clear drink for texture or cocktails, strain vigorously. Keep in mind juices without pulp are more concentrated and may cause quicker blood sugar spikes.
Use the pulp for other recipes
Pulp can be repurposed in muffins, pancakes, soups, vegetable patties, and garden compost. Here are some ideas:
- Add apple pulp to oatmeal or muffins.
- Mix carrot pulp into pancake batter or veggie burgers.
- Fold berry pulp into yogurt or freeze into popsicles.
- Compost fibrous pulp to enrich your garden soil.
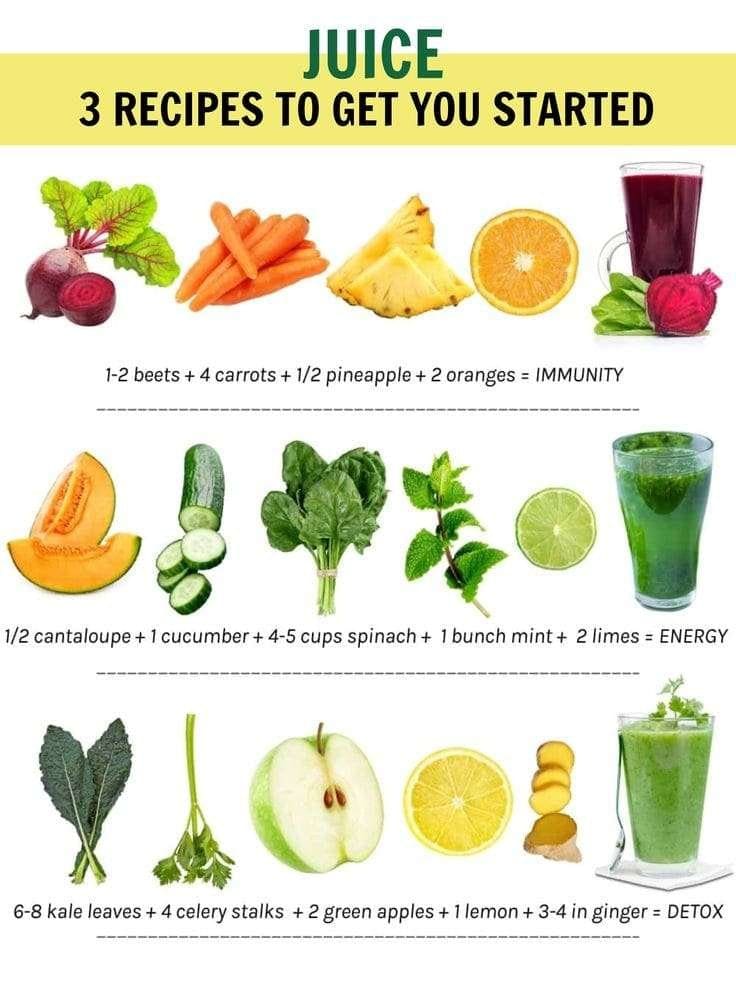
Recipes: starter juice blends without a juicer
Try these recipes to get comfortable with techniques and flavors. Quantities are flexible — scale up as needed.
Morning green energizer (blender + strain)
- 2 cups spinach or kale
- 1 medium apple, cored
- 1 small cucumber
- 1/2 lemon, peeled
- 1/2 inch fresh ginger
- 1/2 cup water
Blend until smooth, strain through a nut milk bag, and serve chilled. Adjust lemon or ginger to taste.
Carrot-apple-ginger juice (blender or food processor)
- 4 medium carrots, chopped
- 2 apples, cored
- 1/2 inch peeled ginger
- 1/2 cup water
Blend, then strain using a fine mesh or cheesecloth. This classic is sweet and bright.
Beet-berry booster (steam or roast + blend)
- 1 small beet, roasted or steamed until tender
- 1 cup strawberries or raspberries
- 1 apple
- Squeeze of lemon
- 1/4 cup water
Blend cooked beet with fruit and strain. Roasting adds caramelized flavors.
Citrus-mint refresher (hand reamer)
- 2 oranges
- 1/2 grapefruit
- 1 tablespoons fresh mint leaves
- Optional: 1 tsp honey or agave
Juice citrus with a reamer and stir in chopped mint. Strain if you want a smooth drink.
Watermelon-lime cooler (blender, light strain)
- 4 cups watermelon chunks
- Juice of 1 lime
- Mint for garnish
Blend watermelon and lime, quickly strain to remove seeds and pulp if desired. Serve over ice.
Nutritional considerations
Juicing alters the balance of fiber and sugar. Understand how that affects your nutrition and health goals.
Fiber loss
Straining removes much of the insoluble fiber, which helps regulate digestion and satiety. If maintaining fiber is important, keep some pulp or alternate with smoothies.
Sugar concentration
Juice concentrates natural sugars, which can raise blood sugar quickly. Pair juices with protein or healthy fats or drink smaller portions if you’re monitoring blood glucose.
Nutrient availability
Juicing makes certain nutrients and phytonutrients more bioavailable. For example, carotenoids in carrots and beets can be absorbed more easily when pureed. However, you lose digestive benefits of whole produce.
Safety for vulnerable groups
Pregnant people, infants, and those with certain medical conditions should check with a healthcare professional about specific juices. For example, unpasteurized juice carries a small risk of foodborne illness for immunocompromised people.
Storage and shelf life
Fresh homemade juice is best consumed quickly but can be stored for short periods.
Refrigerator
Store in a sealed glass jar for 24–48 hours. The fresher, the better for flavor and nutrients. Use an airtight container and fill it to near the top to minimize oxygen exposure.
Freezer
Freeze juice in ice cube trays or freezer-safe containers for up to 3 months. Thaw in the refrigerator and stir before drinking. Note that texture and separation may occur.
Signs juice has gone bad
Discard juice that smells off, has visible mold, or tastes fermented. Cloudiness and mild separation are normal; off-odors or fizz indicate spoilage.
Troubleshooting common problems
You may encounter issues like foam, bitterness, low yield, or astringency. These tips help you fix them.
Juice is too pulpy
Strain again through a finer mesh, cheesecloth, or a nut milk bag. Allow time for settling and decant the clearer liquid.
Juice is bitter
Remove or reduce bitter ingredients. For greens, younger leaves are milder. A small squeeze of citrus or a bit of sweet fruit (apple, pear) balances bitterness.
Low yield
Soften tough produce (steam or roast), add a little water to help blending, or press the pulp with more force. Hot or warm produce often releases more liquid.
Foaming
Foam is common with celery and leafy greens. Let the juice rest for 10–15 minutes and skim off foam, or strain through cheesecloth.
Seeds or grit in juice
Use a finer strainer or double-strain the juice. For seedy berries, pushing the strained pulp through a sieve with a spoon helps separate remaining seeds.
Safety and hygiene tips
Keep your juice safe and delicious by following good kitchen hygiene.
- Wash hands before preparing produce.
- Clean and sanitize cutting boards and utensils, especially after handling root vegetables or beets that stain.
- Use fresh, unblemished produce when possible.
- Refrigerate juice promptly and consume within recommended timeframes.
- Freeze what you can’t use within a day or two.
Frequently asked questions
Answering common questions helps you get more comfortable with homemade juice.
Can you juice leafy greens without a juicer?
Yes. Use a high-speed blender and strain through a nut milk bag, or add greens to blended fruit to improve flavor. Massage greens first if you’re making a raw smoothie for better texture.
Is juice healthier than whole fruit?
Not necessarily. Juice lacks much of the insoluble fiber in whole fruit, which helps regulate blood sugar and promotes fullness. Juice can be part of a healthy diet but shouldn’t fully replace whole fruit and vegetables.
How much juice should you drink?
Portion size depends on your diet and goals. A typical serving is 4–8 ounces. Because juice is concentrated, smaller servings are often appropriate.
Can you pasteurize homemade juice?
You can heat juice briefly to 160–165°F (71–74°C) to reduce microbial load, then cool quickly and refrigerate. This changes flavor and may reduce some nutrients. For longer storage, freeze the juice.
Pulp reuse ideas table
| Pulp Type | Reuse Idea | Notes |
|---|---|---|
| Apple/pear | Add to muffins, pancakes, or oatmeal | Adds moisture and fiber |
| Carrot | Mix into veggie burgers or soups | Boosts color and nutrition |
| Beet | Use in dips or mix with grains for salads | Intense color, earthy flavor |
| Berry | Stir into yogurt or freeze into popsicles | Great for snacks and desserts |
| Greens pulp | Add to savory bakes, eggs, or soups | Use sparingly for flavor |
Final tips for better homemade juice
- Combine fruits and vegetables for balance: fruits for sweetness, vegetables for nutrients and lower sugar.
- Start with small batches to find the flavor and pulp levels you like.
- Use cold produce for freshness; chill juices quickly before serving for best taste.
- Keep a stash of citrus on hand to brighten flavors.
- Experiment with herbs and spices (mint, basil, ginger, turmeric) to add complexity.
Closing encouragement
You have many practical, accessible ways to make delicious juice without a juicer. With a blender, food processor, simple strainers, and a few small techniques, you’ll be making fresh juice that suits your taste and health needs. Try a few methods and recipes, keep track of what you like, and use leftover pulp creatively so nothing goes to waste.